

Affordable Poster Printing That Looks Professional
You've got a community event coming up, the artwork is ready, and the deadline is uncomfortably close. Three Vancouver printers return three very different quotes for the same poster, and the lowest one looks like the obvious choice. Then you notice that one quote excludes finishing, another assumes a lighter stock, and the cheapest option has a turnaround that doesn't match your event.
That's why affordable poster printing shouldn't mean choosing the smallest number on a quote. The useful measure is the total cost of a poster that arrives on time, looks professional, and survives the way people will use it. Size, paper, quantity, finishing, and rush timing all shape that result.
Table of Contents
- What Makes Poster Printing Affordable in Real Life
- The Core Cost Drivers Behind Every Poster Quote
- Paper Stocks and Finishes Compared
- How Quantity Changes the Price You Actually Pay
- Practical Cost-Saving Moves Before You Hit Submit
- Turnaround Timelines and Rush Surcharges
- When Budget Posters Beat Premium and When They Don't
What Makes Poster Printing Affordable in Real Life
A small bakery in East Vancouver needs 50 copies for a weekend event. Three quotes arrive, ranging from $185 to $410. The lowest looks like the clear choice until the production assumptions are compared.
One printer includes lighter coated stock and standard turnaround. Another includes heavier paper, lamination, and more careful trimming. The third has included setup and expedited production. After the artwork needs file preparation for clean production, the $185 quote becomes $239. That charge covers work the headline price left outside the original estimate.
The first number can also exclude tax, finishing, mounting, delivery, or rush handling. Canadian pricing references note that posters and finishing may be billed separately, while faster turnaround can carry a surcharge. The Canadian poster-price guide helps separate a base print price from the completed job.
Practical rule: Compare the price of usable posters in hand, not the first line of a search result.
For a Vancouver buyer, five questions expose the cost quickly:
- What size is included? Standard formats usually cost less than custom trimming.
- Which stock is included? Coated bond, heavier coated paper, and polypropylene suit different uses.
- Is finishing included? Lamination and mounting can change both price and production time.
- When will the job be ready? Standard and rush production are different services.
- What file preparation is covered? Bleed, colour conversion, resolution checks, and corrections may be separate.
Because standard sizes and stocks are stocked in volume across Canadian print shops, these questions usually reveal the meaningful price difference within one quote cycle. The Government of Canada printing-industry reference provides historical industry context, but it does not support treating a current market valuation as evidence for today's poster prices.
The practical comparison is total cost per usable poster. Power Print's poster printing services cover the stock, size, and finishing choices that determine that total. A cheaper order can cost more if it arrives late, needs reprinting, or cannot handle the venue's handling and display conditions.
The Core Cost Drivers Behind Every Poster Quote
Before comparing prices, use a simple production model:
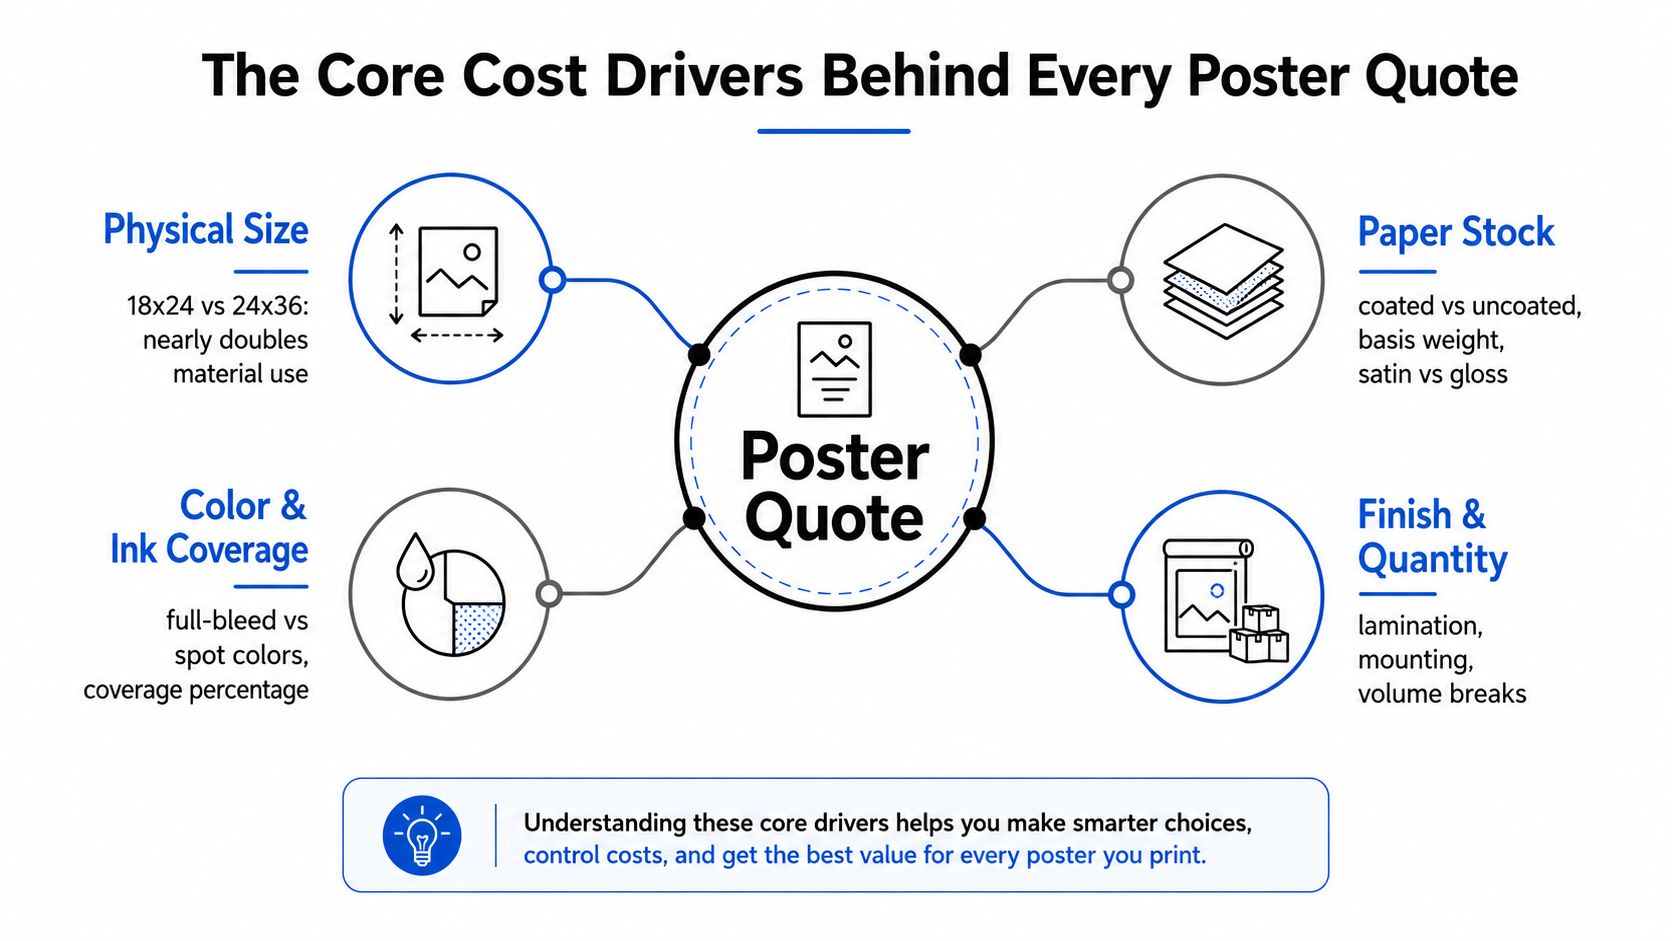
Poster cost = material area + fixed setup + machine and labour time + finishing + waste allowance.
That model explains why a small change in the brief can shift the quote. The printer must purchase or allocate substrate, prepare the file, run the press or wide-format machine, trim the sheets, and handle any additional finishing. Some of those costs apply once to the order. Others apply to every copy.
Size changes more than the visual impact
A larger poster uses more substrate and may move the job from digital production to large-format equipment. The difference isn't only the paper area. Large pieces can require different handling, trimming, packaging, and display materials.
Choose the smallest format that keeps the headline, date, location, and call to action readable from the intended viewing distance. A standard size often reduces waste because the printer can impose it efficiently on available sheets.
Stock controls feel and performance
A coated gloss paper can make photographs and saturated colour appear more vivid, while satin or matte surfaces reduce reflections. Heavier stock feels stiffer and can tolerate more handling, but it also increases material cost and may affect folding, rolling, or mounting.
California print menus show this same trade-off. Economy posters commonly use 100 lb gloss stock, while institutional options include 110 lb index matte and 80 lb semi-dull paper, as described in California poster stock guidance. The right choice depends on whether the poster is temporary information or a piece of branded display material.
Quantity spreads fixed work
File checks, setup, and production preparation happen whether you order a few copies or a larger run. A larger quantity distributes those fixed costs across more posters, which is why per-unit pricing usually falls as the order grows.
Finishing adds labour and handling
Lamination, mounting, trimming, hemming, and special surface treatments all add steps. Two quotes with the same size and stock can still differ because one printer has allowed more machine time, setup work, or production waste.
For an accurate estimate, send the final size, quantity, one-sided or two-sided requirement, stock preference, finish, deadline, and delivery or pickup requirement through Power Print's quote request page.
Paper Stocks and Finishes Compared
Paper should match the environment, not just the design. A lightweight gloss poster may be completely suitable behind acrylic or inside a protected frame, but it can curl or scuff when repeatedly handled on a busy community board. A heavier stock may cost more upfront while reducing replacement and reprinting risk.
Canadian listings describe a material ladder from standard coated bond to heavier coated bond and polypropylene. Polypropylene is positioned for repeated handling or outdoor-style display in this Canadian poster-material comparison. That distinction matters in British Columbia, where event signage may face damp conditions, frequent transport, or multiple installations.
| Stock & Finish | Relative Price | Best Use Case |
|---|---|---|
| Lightweight coated gloss, no finish | Lower | Short indoor promotions, temporary event notices, protected displays |
| Medium satin, no finish | Moderate | Retail notices, trade-show graphics, and posters viewed under mixed lighting |
| Heavier matte, no finish | Moderate to higher | Bright venues, information-heavy layouts, and situations where glare is distracting |
| Coated stock with gloss lamination | Higher | Colour-forward indoor displays that need surface protection |
| Coated stock with matte lamination | Higher | Professional signage where reduced glare and a smoother touch matter |
| Polypropylene with protective finish | Highest among these options | Repeated handling, longer display periods, and more demanding environments |
Match the surface to the lighting
Gloss is effective when colour impact matters and reflections are controlled. It's less comfortable under direct spotlights or in shop windows facing strong daylight. Satin provides a middle ground, while matte is often easier to read when viewers stand close to the poster.
Treat lamination as protection, not decoration
Lamination makes sense when people will touch, move, stack, or reuse the posters. It's harder to justify for a short indoor promotion that will be mounted once and discarded after the event. Matte lamination can reduce glare, while gloss lamination tends to emphasize colour and contrast.
Don't confuse weight with durability
A heavier sheet feels more substantial, but it isn't automatically weather-resistant. If the display may encounter moisture, ask about a suitable synthetic substrate rather than just upgrading paper weight. For standard indoor jobs, a well-chosen coated stock often delivers better cost-to-quality value than an unnecessarily thick board.
You can review available poster and print formats through Power Print's printing collection, then ask the shop to match the material to your display conditions.
How Quantity Changes the Price You Actually Pay
Quantity affects the quote through fixed setup work and production efficiency. A single large poster carries the full burden of file preparation and machine setup, while a run of identical posters lets the printer repeat the same process across the order.
BC pricing makes the pattern visible. A Victoria price sheet lists 11×17 posters at $44 for 50 single-sided copies, $82.50 for 100, $192.50 for 250, and $550 for 1,000. Those figures appear in the Victoria poster-pricing reference. The point isn't to treat those amounts as a universal Vancouver quote. It's to see how the total changes differently from the unit price as quantity rises.
| Quantity | Approx. Unit Price (CAD) | Total Order (CAD) |
|---|---|---|
| 50 | $0.88 | $44 |
| 100 | $0.83 | $82.50 |
| 250 | $0.77 | $192.50 |
| 1,000 | $0.55 | $550 |
This benchmark uses 11×17, not 18×24, so don't use it as a direct quote for a larger format. It does show the buying principle clearly. The order total rises as more posters are produced, but the unit cost doesn't rise at the same rate.
A Vancouver price list gives another view, with 11×17 digital posters at about $0.55 to $1.39 each, depending on stock and whether the printing is single- or double-sided. Packaged runs of 500 to 1,000 are priced around $400 to $1,400, as described in the Vancouver poster-price benchmark. Standardization and volume are doing much of the work.
Calculate usable-unit cost
Divide the complete invoice by the number of posters that will be used. Include finishing, delivery, tax, and any reprints caused by approved production defects or file problems. If you're ordering several designs, ask whether combining them in one production request changes setup or trimming costs.
Don't order excess copies to chase a lower unit price. Unused posters still represent a cost, especially when an event date, promotion, or price changes quickly.
Practical Cost-Saving Moves Before You Hit Submit
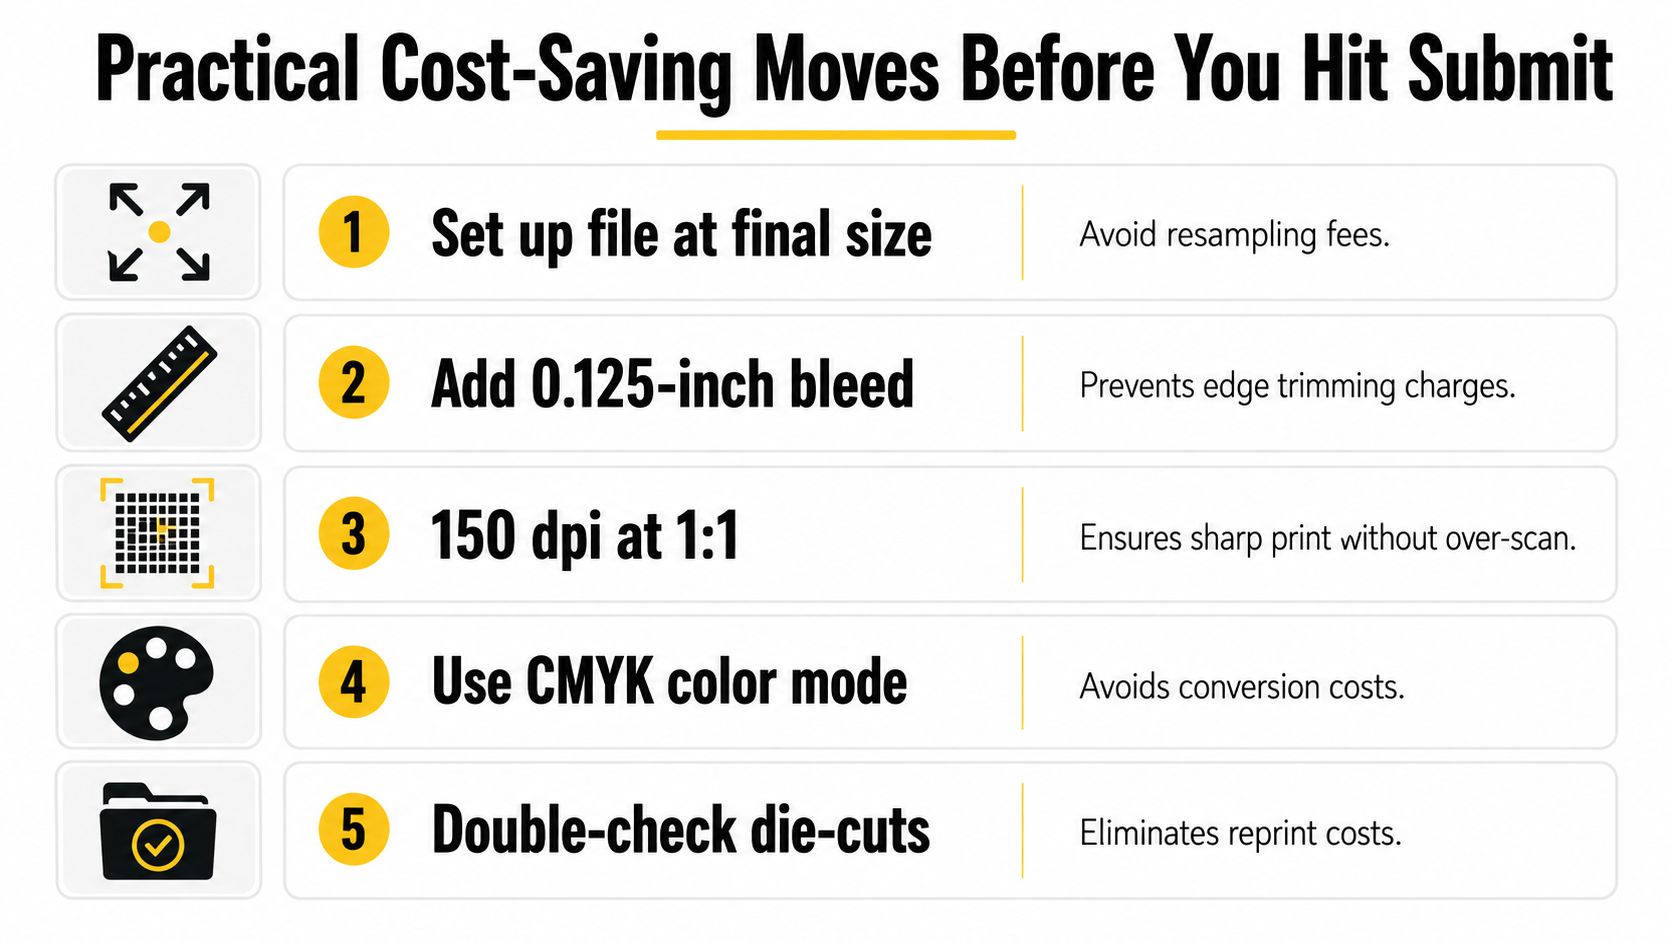
The safest savings happen before production begins. A clean file, standard size, and clear approval process reduce avoidable labour without weakening the finished poster.
Build the file for the final output
Set the artwork at its final size rather than expecting the printer to enlarge or rebuild it. Include 0.125-inch bleed where the design runs to the edge, and prepare images at 150 dpi at 1:1 when that matches the printer's production requirements. This reduces resampling and correction work.
Keep important text, dates, and contact details inside the safe area. A printer can trim accurately, but artwork placed too close to the cut line creates risk.
Choose a standard cut size
A custom format may look distinctive, but it can increase trimming and substrate waste. If a design is 19×27, test whether it can be reformatted to 18×24 without reducing readability or visual impact. Standard formats are easier to impose and typically make better use of available sheets.
Use finishing selectively
Indoor posters that will be mounted once may not need lamination. Reserve it for posters that will be handled, transported, or reused. A protective finish has more value on a reusable wayfinding sign than on a short-lived notice inside a controlled venue.
Combine compatible designs
If a campaign has several poster versions, send them together when the printer can process them as one organised job. Shared file checks and setup may reduce duplicated handling, although each design may still require separate proofing or trimming.
Approve a digital proof carefully
A soft proof can help you catch spelling, placement, and colour-mode problems without paying for a physical proof. It won't reproduce every detail of the final paper surface, so use it for layout and content approval, then ask the printer about colour expectations when the brand match is critical.
Before submitting, check these practical points:
- Final dimensions: The document matches the ordered poster size.
- Bleed and safe area: Edge artwork extends beyond the trim, while key content stays clear.
- Colour mode: The file follows the printer's requested colour workflow.
- Image quality: Photographs and logos look sharp at final output size.
- Quantity and versions: The order count matches the distribution plan.
- Approval record: The final proof is the version authorised for production.
These steps don't make a poor design better. They prevent avoidable production charges and reduce the chance that an affordable order becomes an expensive correction.
Turnaround Timelines and Rush Surcharges
Speed is a production choice with a price. A job that can move through a normal queue may require overtime handling, machine priority, or a different finishing sequence when the deadline is immediate.
For many Vancouver shops, standard runs commonly take 2 to 4 business days, while same-day and next-day services can carry rush surcharges ranging from 25% to 100%, depending on the stock and finish. The Canadian print pricing guidance also flags faster turnaround as a separate cost consideration.
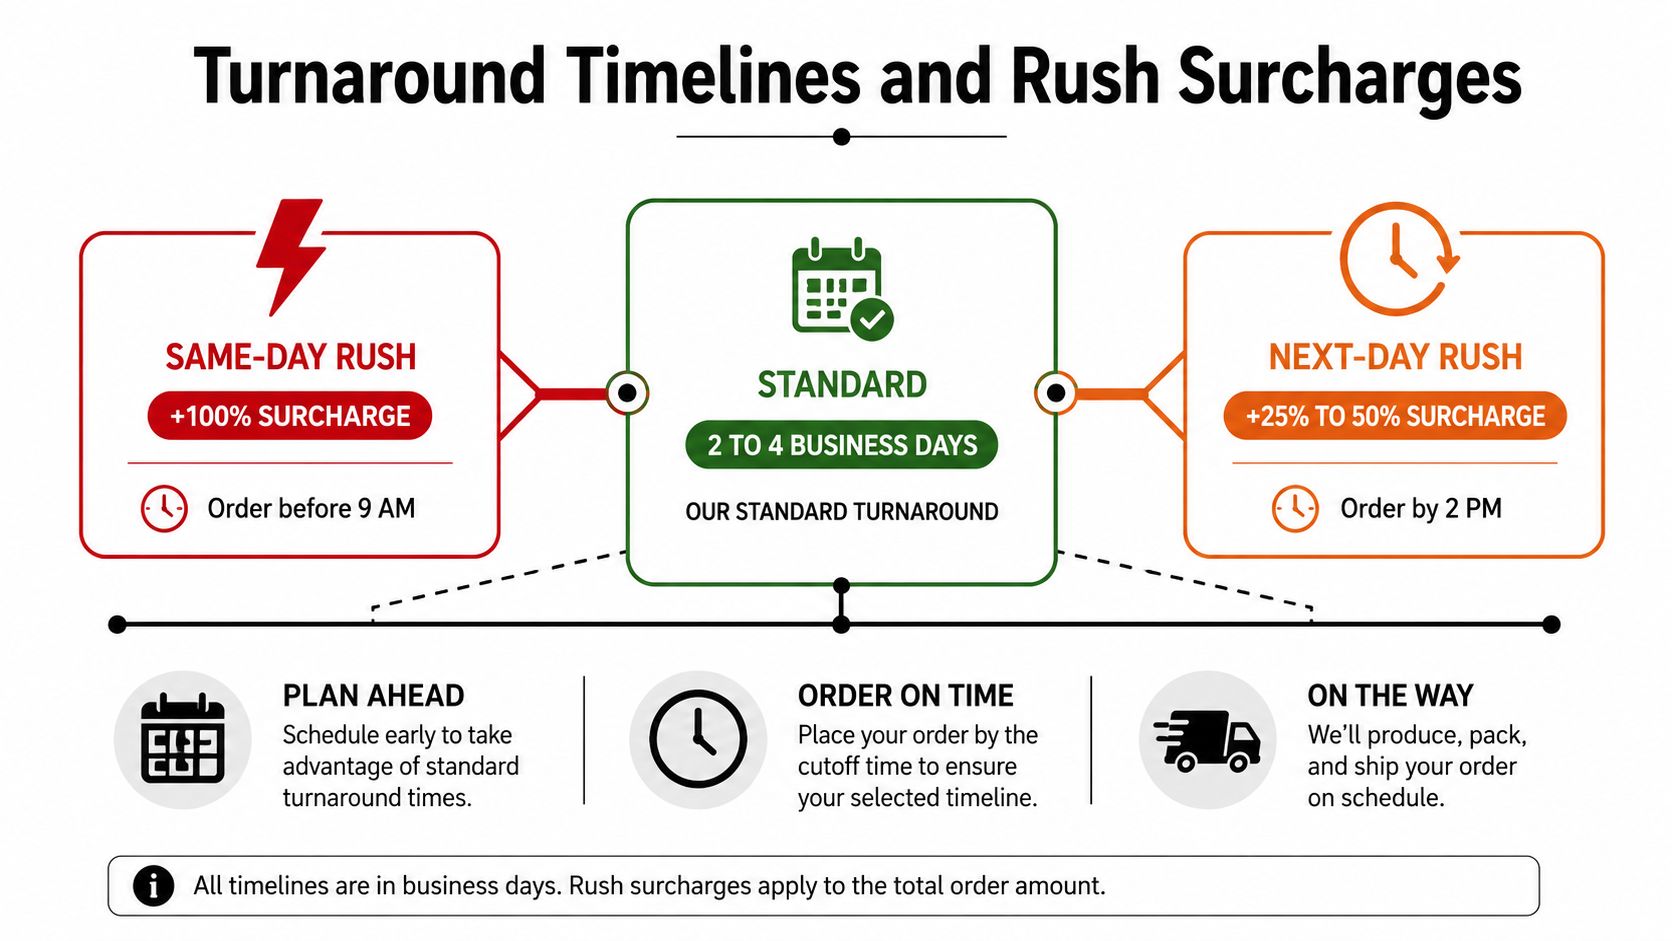
An event ordered well ahead of the installation date can usually use standard production. A Friday pickup requested late in the week may enter a rush tier, especially if the printer must check a new file or source a particular stock. Same-day production becomes more restrictive when you add lamination, mounting, unusual trimming, or a large quantity.
Schedule the finishing, not just the printing. Lamination and mounting can add a full production day, so a job promised within one day may become a two-day process once those steps are included.
The quiet cost appears when buyers count backward from the event without allowing time for approval. A corrected file, delayed proof, failed colour check, or missing bleed can push the job into a more expensive queue. A printer may also offer a fast print but not a fast delivery window, so pickup and shipping need separate confirmation.
Use this planning sequence:
- Set the installation or event deadline.
- Allow time for delivery or pickup.
- Allow one production window for printing.
- Add time for lamination or mounting if required.
- Leave room for file approval and corrections.
- Ask for the rush price only after the standard deadline is clear.
A visual explanation of print preparation and production stages can also help teams align their internal approvals:
The affordable option is often the order that enters production before the deadline becomes urgent.
When Budget Posters Beat Premium and When They Don't
Budget posters work when the display has a short life, limited handling, and a controlled environment. A temporary classroom notice, community-board announcement, event backdrop viewed from a distance, or indoor promotion can look polished on a practical coated stock with a restrained finish.
Premium materials earn their cost when the poster itself carries brand value or must keep working after installation. Retail point-of-sale signage, gallery work, trade-show graphics, real-estate display material, and posters that will be photographed or reused need stronger protection against curling, glare, scuffing, and handling damage.
| Use Case | Recommended Tier | Why | Key Specs |
|---|---|---|---|
| Short indoor promotion | Budget | The poster has a limited display life | Standard coated stock, no finish or selective lamination |
| Classroom or community notice | Budget | Readability matters more than a luxury feel | Matte or satin surface, standard size |
| Retail point-of-sale display | Premium | Customers handle and notice the sign at close range | Heavier stock, protective finish, accurate colour |
| Trade-show graphics | Premium | Transport and repeated setup can damage light paper | Stiffer stock, lamination or synthetic substrate |
| Gallery or art print | Premium | The print is part of the product experience | Premium photo stock and controlled finishing |
| Temporary event backdrop | Budget to mid-range | Viewing distance can hide minor surface differences | Larger format selected for readability, practical stock |
| Reusable wayfinding signage | Premium | Replacement costs can exceed the initial saving | Durable substrate and protective finish |
A straightforward test helps. If the poster will be mounted once, viewed for a short period, and left untouched, budget production is usually sensible. If it will travel, be handled, remain in place for an extended period, or represent a premium brand, upgrade the stock or finish.
Don't upgrade blindly. A thick sheet won't solve poor contrast, weak hierarchy, or an overcrowded layout. Likewise, a premium finish won't rescue a file with blurry images or text placed too close to the trim.
Use this final checklist:
- Exposure: Is the poster indoors, protected outdoors, or fully exposed?
- Handling: Will staff, customers, or attendees move it?
- Lifespan: Is it temporary, reusable, or part of a permanent display?
- Distance: Will people read it nearby or from across a room?
- Brand role: Is the poster supporting a promotion, or is it the product?
- Replacement risk: Would damage force another print run before the campaign ends?
Affordable poster printing works best when the specification matches the job. Power Print offers posters alongside signage and branded print services, with no-minimum options and bulk programmes, so Vancouver organisations can request a format that fits both the campaign and the expected use.
Send your poster size, quantity, stock preference, finishing requirements, and deadline to Power Print for a practical production quote. If you're unsure which material will hold up at your Vancouver event or display location, ask for a recommendation based on handling, lifespan, and total usable cost.