

Personal Cards Printing: Stock, Finishes, and Tips
A Vancouver realtor walked into a Gastown print shop the morning after a cold-lead pitch with a phone full of digital contacts and nothing useful to leave behind. The conversation had gone well, but once the elevator doors closed, the prospect had no physical reminder of the realtor's name, service area, or next step.
That situation is common in personal cards printing. A QR code, LinkedIn connection, or contact shared by phone can start a conversation, but a well-made card gives the recipient something they can put beside a keyboard, into a wallet, or on a desk. In a city where meetings move from coffee shops to construction sites to industry events, that small object still earns its place.
The decision isn't about choosing a design. Stock, finish, quantity, and turnaround have to work together, especially when a Vancouver shop needs to produce the order this week. The right combination depends on whether the card must feel premium, survive frequent handling, support a QR-led follow-up, or arrive before an event.
Table of Contents
- Why Personal Cards Printing Still Matters in 2026
- The Core Vocabulary of Personal Cards Printing
- Choosing the Right Paper Stock and Weight
- Finishes That Change How a Card Feels
- Getting Files, Colour, and Mockups Production-Ready
- Turnaround, Quantity, and the Real Cost Curve
- How to Pick the Right Vancouver Printer
- Your Pre-Order Checklist Before You Hit Send
Why Personal Cards Printing Still Matters in 2026
Digital networking has raised the standard for printed cards rather than removing the need for them. Recipients expect a card to look intentional, feel substantial, and lead smoothly to a website, booking page, portfolio, or professional profile. A printed card with a well-sized QR code can connect a physical introduction to a digital follow-up without asking someone to type a long URL.
That matters after the meeting ends. A phone contact can disappear among notifications, while a card can remain visible during the elevator ride home and the days that follow. The physical format also gives a freelancer, consultant, realtor, or small-business owner a controlled moment of brand presentation. Paper colour, edge thickness, surface texture, and legibility all communicate before the recipient visits a website.
Canadian printing remains a durable commercial base for this kind of work. The broader Canadian printing industry reached about C$8.9 billion in revenue in 2026, with approximately 5,058 businesses operating nationwide, and revenue was flat from 2021 to 2026 at a 0.1% CAGR, according to IBISWorld's Canadian printing industry profile. Business cards and similar short-run collateral are typically produced within that wider print ecosystem, not as an isolated market.
Practical rule: A card shouldn't try to replace your digital presence. It should make the next digital action easier.
The four decisions that control the result
- Stock: Determines the card's weight, stiffness, writing surface, and resistance to bending.
- Finish: Changes how colour, fingerprints, moisture, and texture behave in the recipient's hand.
- Quantity: Controls the per-card economics and the risk of being left with outdated contact details.
- Turnaround: Includes file approval, production, finishing, and pickup, not just time on the press.
A competent Vancouver printer can often adapt the production route to the deadline, but only after the file, material, quantity, and approval path are clear. Treating those choices as one coordinated order is how you avoid a card that looks good on screen but arrives too late, feels too light, or doesn't fit the way you work.
The Core Vocabulary of Personal Cards Printing
A Vancouver print quote is easier to approve when the production terms are specific. For this section, focus on the file and scheduling language that determines whether the order can run this week. Stock weight and paper comparisons belong with the material decision, where the practical differences can be assessed together.
The terms that affect your quote
Bleed is artwork that extends beyond the final trim edge. A standard card commonly uses a 0.125-inch bleed on each side, allowing the background to continue past the cut. That extra area prevents a narrow white edge if the trimming shifts slightly during production.
Safe zone is the interior area reserved for important information. Keep text, logos, phone numbers, and QR codes at least 0.125 inches inside the trim line. A file can be technically printable yet still feel poorly finished if contact details sit too close to the edge.
Trim line marks the finished card boundary. It is a guide for production, not a guarantee that every cut will fall on the exact pixel shown in the proof. Backgrounds should reach the bleed, while key details stay inside the safe zone.
Turnaround starts after the printer receives an approved, production-ready file. It usually includes printing and finishing, but not time lost to corrections, unanswered proof emails, shipping, or a late change. A same-week request is only realistic when the file is ready and the chosen stock and finish are available locally.
| Term | Plain Meaning |
|---|---|
| Bleed | Artwork extending beyond the trim edge |
| Safe zone | The area kept clear of the trim |
| Trim line | The intended finished edge of the card |
| Turnaround | Production time after file approval |
A printer may also ask whether the file is production-ready. That normally means the dimensions are correct, bleed is included, important details sit within the safe zone, images are suitable for output, and the final proof has been approved. Clarifying these points before quoting avoids treating proof corrections as press time.
Ask for the production schedule in plain terms: when the file must be approved, when printing and finishing are expected to end, and whether pickup or delivery is included. A Vancouver shop can often recommend a route that fits the week, but the available combination of file condition, finish, quantity, and deadline controls the result.
For repeat orders, keep the approved proof and the exact specifications on file. “Business card printing” is too broad to reproduce a previous job reliably. Record the finished size, bleed, safe zone, stock name, finish, quantity, and approval date so the next quote can be matched against the original order.
Choosing the Right Paper Stock and Weight
A card carried loose in a pocket faces different wear from one handed across a boardroom table. Stock, finish, quantity, and turnaround need to work together, especially when a Vancouver printer is fitting the job into this week's production schedule.
For most professional cards, 300 GSM is the practical floor. It avoids a flimsy feel and suits a first order, a high-volume handout, or a card likely to be replaced when contact details change. It can show wear sooner when carried loose or rubbed repeatedly against a transit pass.
At 350 GSM, the card feels more assured without becoming awkward to store. This is the everyday professional range I'd suggest for a Vancouver consultant, realtor, designer, or service contractor who wants a card to keep its shape through ordinary handling. Higher GSM generally improves resistance to bending, and Jukebox Print's technical comparison of Canadian business-card weights explains why this stock feels stiffer than lighter options.
The 400 GSM and above category suits buyers who want a noticeably rigid, premium object. Extra thickness can make wallet storage less convenient, and a rigid card may expose weak corners, poor trimming, or a delicate finish. Confirm the printer has the stock available before choosing it for a tight deadline.
Coated and uncoated stocks behave differently
Silk, satin, and gloss-coated stocks reproduce colour and small graphics clearly. They suit gradients, dark backgrounds, and image-heavy layouts. Uncoated linen, cotton, kraft, and recycled boards absorb ink more readily, so colours can appear softer and less saturated. That softer result is often the intended character of the stock.
A card spending a week in a back pocket needs a different specification from one exchanged during a short meeting. Gloss or a protective laminate handles moisture and rubbing better. Uncoated stock may mark sooner, yet it provides a more tactile, writable surface. For a rainy commute, gloss lamination adds a moisture-resistant barrier and slight rigidity, according to British Columbia's business-card production guidance.
| Stock / Weight | Feel | Durability |
|---|---|---|
| 300 GSM | Professional but relatively light | Suitable for routine handouts, with less resistance to bending |
| 350 GSM | Firm and balanced | Reliable for regular meetings and wallet handling |
| 400 GSM and above | Rigid and premium | Strong against bending, but less flexible for storage |
| Recycled board | Natural, textured, or softly varied | Depends on the specific fibre and surface |
| Duplex stock | Thick, layered, and substantial | Adds stiffness, with more construction considerations |
| Edge-painted stock | Bold edge detail | Requires careful handling to protect the edge treatment |
For a deliberately heavier card, compare double-thick business cards from Power Print. Ask how the construction affects trimming, corners, finishing, and the final turnaround before approving the quote.
Finishes That Change How a Card Feels
Finish should follow the reaction you want from the recipient. Matte creates a quiet, controlled surface with less glare than gloss. It suits real estate, consulting, professional services, and restrained identity systems where the logo and typography should carry the design rather than a reflective coating.
Soft-touch laminate goes further. It creates a smooth, slightly velvety feel and adds a protective layer, but it can make dark colours show handling marks more readily than a lighter design. It earns its cost when the card is meant to feel premium in a direct exchange, not because “premium” appears on a printer's upgrade list. Soft-touch business cards from Power Print are one option to compare when that tactile finish is part of the brief.
Match the surface to the job
Gloss remains useful for colour-heavy photography, retail promotions, loyalty cards, and graphics that need visual punch. It reflects more light and can be less comfortable to read under strong overhead lighting. A glossy surface also makes handwriting difficult, so it isn't a good fit when recipients may need to add notes.
Uncoated stock is the practical choice for writers, academics, coaches, and professionals who exchange handwritten details. It gives a more organic impression and accepts pen better, but the ink may look less sharply defined and broad dark areas can feel less even.
Specialty treatments should have a specific job. Foil can highlight a logo or name, spot UV can add contrast to selected areas, and letterpress can create physical impression. Edge paint makes sense when the card is displayed or handed out selectively, but it can be excessive for a card that will be kept in a wallet.
| Finish | Feel | Best For | Cost |
|---|---|---|---|
| Matte | Smooth, low-glare, restrained | Consulting, design, real estate, professional services | Moderate |
| Gloss | Bright and reflective | Photography, retail, promotions | Moderate |
| Soft-touch laminate | Velvety and tactile | Premium introductions and brand-led meetings | Higher |
| Uncoated | Natural and writable | Writers, academics, notes, personal referrals | Moderate |
| Foil, spot UV, or letterpress | Distinctive and deliberate | Focused brand details and selective handouts | Higher |
A simple rule works well. Choose matte for calm confidence, gloss for visual energy, uncoated for writing, soft-touch for tactility, and specialty finishing only when the audience will notice the detail.
Getting Files, Colour, and Mockups Production-Ready
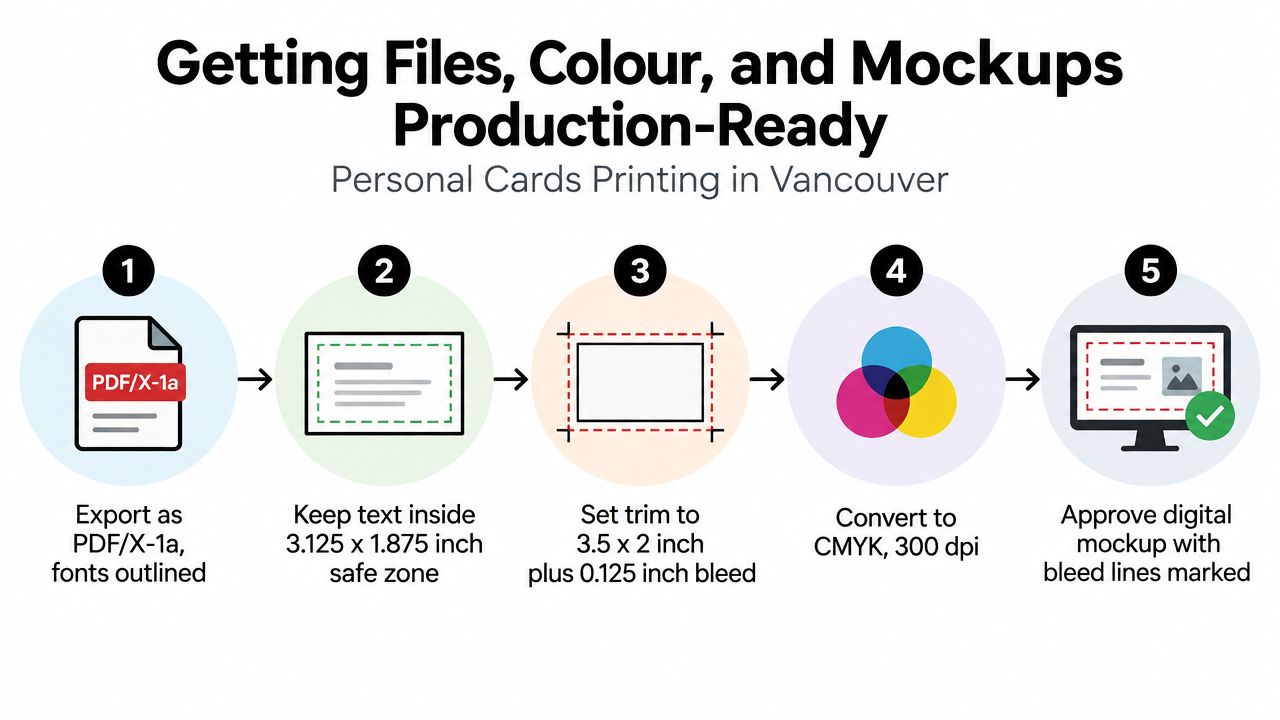
A printer can't rescue every file at the production stage. The cleanest personal cards printing jobs arrive as PDF/X-1a, with fonts outlined or supplied, images prepared at an appropriate resolution, and the trim and bleed clearly built into the document.
For a 3.5 × 2 inch finished card, set the document to the trim size plus the required bleed. The production file should include a 0.125-inch bleed, while important content should remain inside a safe area of approximately 3.125 × 1.875 inches. Keep names, phone numbers, email addresses, and QR codes away from the cut line. A background can run out. A phone number shouldn't.
Colour needs a production decision
RGB is designed for screens, not for the ink or toner systems used in commercial printing. A shop can convert an RGB file, but that conversion may alter bright greens, blues, or highly saturated colours. Supplying a CMYK file gives you more control over the intended print result.
Pantone spot colours still have a place when a brand colour must be managed consistently across cards, signage, packaging, or apparel. They don't guarantee that every material will look identical, but they give the printer a defined reference rather than leaving the colour decision to an automatic conversion.
A digital mockup should show the card at its trim size, with bleed lines marked and both sides visible when applicable. Check the actual content, not only the overall appearance. A physical press proof gives you a more realistic view of stock, ink density, and finishing, but it adds a step to the schedule. Skipping approval is the fastest way to turn a correctable file issue into a deadline problem.
File approval is part of the turnaround. The production clock shouldn't start until the person responsible has checked the proof and replied clearly.
The device handling the job also matters. Digital presses are well suited to variable information and short runs, while offset production can make sense when the quantity and colour requirements justify setup. Ask which route the shop recommends and why. Then approve the mockup in writing before production begins.
Turnaround, Quantity, and the Real Cost Curve
Quantity changes more than the total on a quote. It changes the production method, proofing requirements, storage risk, and your ability to respond when a phone number or job title changes.
A short digital order is usually the flexible route. Vancouver shops commonly offer no-minimum digital production, and a straightforward approved file can often move from proof to pickup within one to three business days. That convenience generally comes with a higher per-card cost, but it protects a new business owner from storing a large supply of cards that may become outdated.
Bulk production becomes more attractive as the quantity rises. Orders in the range of 500 to 1,000 or more cards may support an offset workflow, where setup costs are spread across more pieces and the per-unit cost falls. The trade-off is time. A bulk run may take five to seven business days, particularly when it includes physical proofing, special stock, coating, or a firm colour requirement.
The deadline changes the sensible choice
Digital production can often rely on a calibrated screen mockup, allowing the printer to keep the workflow moving after approval. Offset orders usually need more preparation, and a physical proof or sign-off email can become a required milestone before the press date is confirmed.
There isn't one universal breakeven quantity. It depends on stock, sides, colour coverage, finishing, setup, and whether the printer already has the material in-house. Ask the shop to quote both routes at your intended quantity. The useful question is not, “What does 500 cost?” It's, “At what quantity does the lower unit cost justify the longer commitment?”
| Order Type | Typical Quantity | Turnaround | Per-Unit Cost | Proofing |
|---|---|---|---|---|
| Short-run digital | No minimum to a small run | Often one to three business days after approval | Higher | Usually digital mockup |
| Bulk offset | 500 to 1,000 or more | Often five to seven business days after approval | Lower at scale | Physical proof may be required |
Deadline rule: A lower unit price doesn't help if the cards arrive after the event.
Avoid over-ordering when your business is changing quickly. A smaller run may cost more per card, but it can be cheaper overall than discarding cards with an old email address, role, service area, or brand mark.
How to Pick the Right Vancouver Printer
The lowest quote for a bulk order tells you very little about the production process. A reliable printer will ask what the card is for, how soon it's needed, which stock you want, and whether the colour must match an existing piece. Those questions show that the shop is pricing a job rather than guessing at a rectangle.
Look for a digital mockup with bleed lines clearly marked. Confirm the stock by its actual name and GSM, and ask whether the printer is using a digital press or an offset process. If the answer is only “our thickest paper,” you still don't have enough information to approve the order.
Questions that reveal production quality
- Ask about proofs: Find out whether a calibrated soft proof is included, whether a hard-copy proof costs extra, and how many correction rounds the quote allows.
- Ask about colour: Check what happens if the printed result drifts from the approved reference and whether a previous job can be matched.
- Ask about finishing: Confirm whether rounded corners, foil, spot UV, lamination, edge work, or direct mailing are handled in-house or sent elsewhere.
- Ask about pickup: Local pickup in Vancouver, including areas such as West Pender, Mount Pleasant, or Burnaby, can remove shipping time and make inspection easier.
- Ask for samples: A physical stock pack is more useful than a screen image when the decision depends on stiffness, texture, or surface feel.
A printer that provides design adjustments, mockup review, and related collateral can also reduce handoffs. Power Print's service mix includes business cards and other branded print collateral, along with graphic design support and pre-production mockup previews. That kind of bundled workflow may suit a business coordinating cards with signage, apparel, or promotional merchandise.
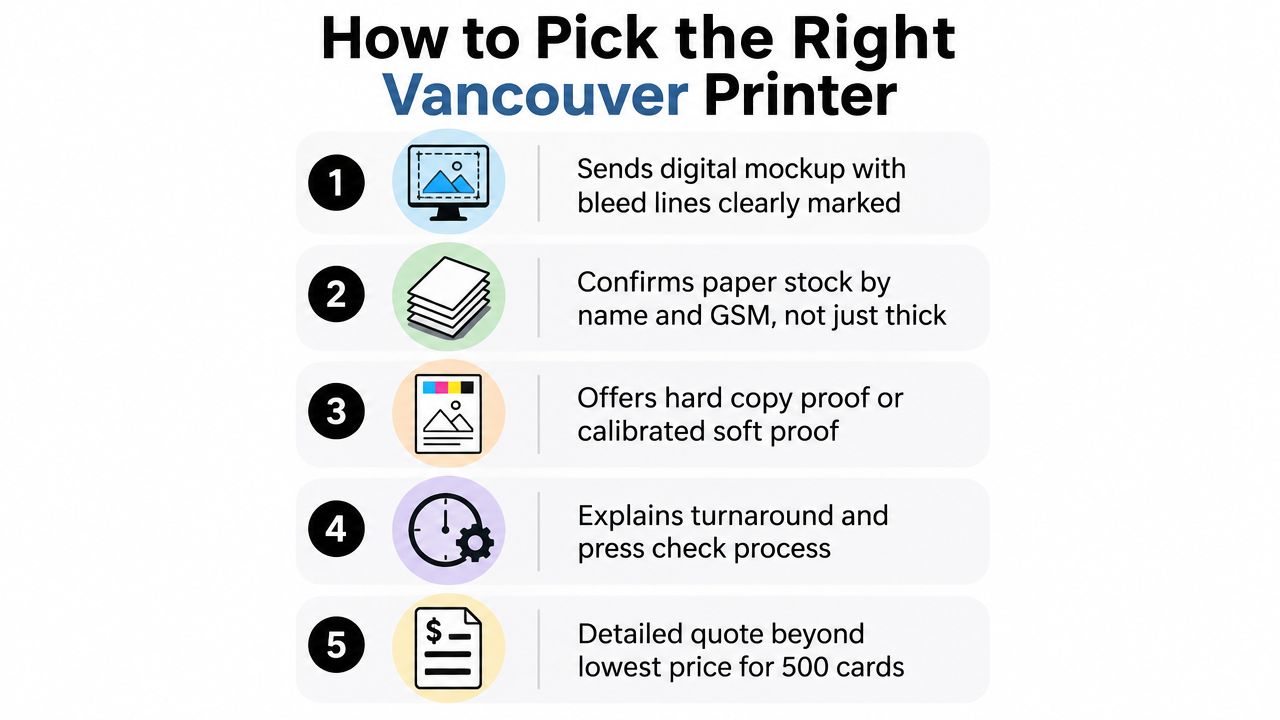
For urgent work, ask specifically about same-day business-card printing, including the file cutoff, available stocks, finishing limits, and pickup time. “Same day” only helps if your design, proof, and approval are ready early enough for the shop's actual schedule.
Your Pre-Order Checklist Before You Hit Send
The most expensive card errors are usually ordinary. A typo, an incorrect title, a missing bleed, or an unconfirmed pickup date can create more trouble than an ambitious design. Run the order through one written checklist before sending the file.
Confirm the physical specification
Write the stock name, GSM, finish, size, corner treatment, and quantity into the quote or order confirmation. If the document only says “premium card,” ask for a specific material description. Confirm whether the finish applies to one side or both, and make sure the final card will work in the wallet or presentation setting where you expect to use it.
Inspect the production file
Check these items before approval:
- Document size: The trim is 3.5 × 2 inches, with 0.125 inches of bleed on every side.
- Safe area: Text, logos, and QR codes sit comfortably inside the trim line.
- Fonts: Fonts are outlined or packaged according to the printer's requirements.
- Images: Images are prepared at 300 DPI where appropriate for the final size.
- Colour: Artwork is supplied in CMYK or in the printer's specified profile.
- File format: PDF/X-1a is used when that's the shop's preferred standard.
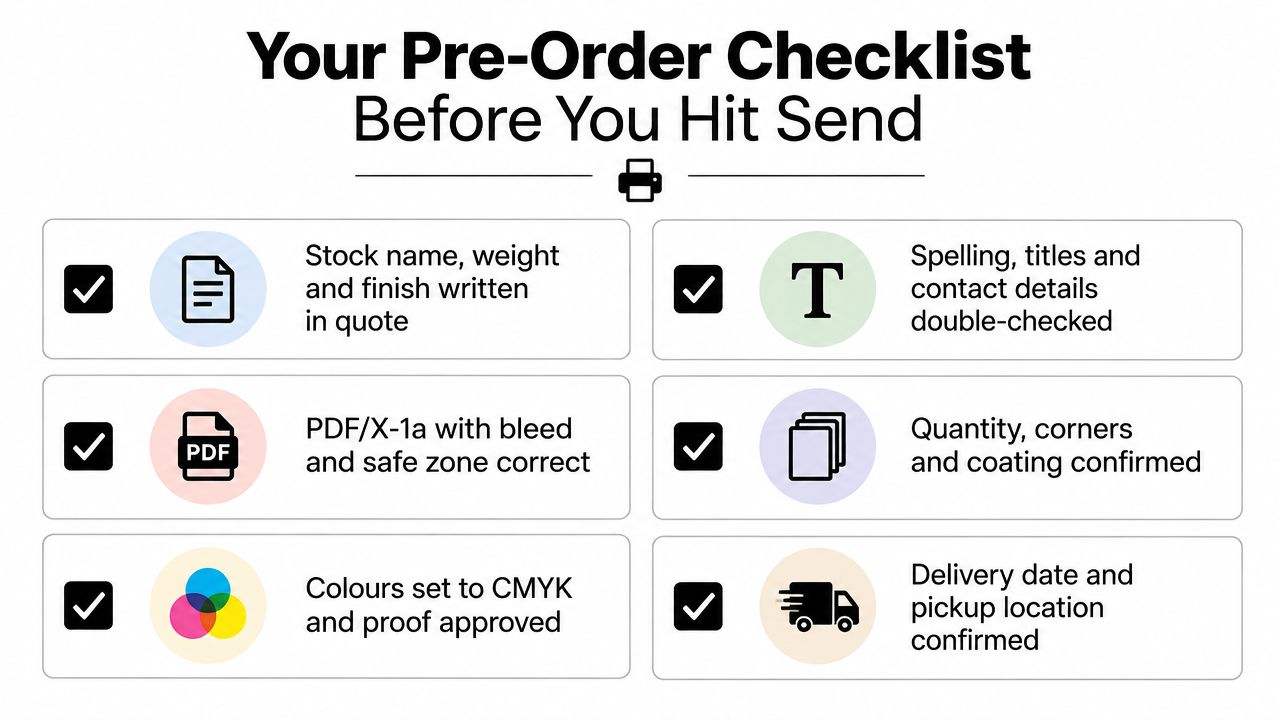
Read every proof slowly. Verify the spelling of names, phone numbers, email addresses, website URLs, job titles, social handles, and QR destinations. Have a second person read it too, because the person who created the file often sees the intended text rather than the text that's there.
Confirm the schedule in writing
Ask for the number of business days, the point when the clock starts, the proofing deadline, and the pickup or delivery method. If an event is fixed, tell the printer the date before choosing stock or specialty finishing. Decide whether a modest oversupply is useful for replacements, but don't order a large reserve if your contact information or brand system is likely to change.
That final check links the whole job together. The material determines the feel, the finish affects handling, the quantity shapes the economics, and approval protects the deadline.
Power Print can help with business cards, short-run colour print, design support, and pre-production mockup approval for Vancouver orders. Review the available options at Power Print, then send the shop your preferred stock, finish, quantity, and required pickup date so the team can recommend a production route that fits the job.